|
Molecular
Biology Protocols |
|
1. An Introduction to Designing Degenerate Primers for PCR
Step 1: Locating sequences of interest
Alternative A: Searching GenBank with the names of genes and proteins. Log into GenBank at http://www.ncbi.nlm.nih.gov/ and perform a search using reasonable names for your gene or protein of interest. You may wish to include other search terms as well, such as species or tissue. If you are provided hundreds (or thousands) of responses, narrow your search by including a term such as "complete cDNA" or "EST", thus returning only complete cDNA sequences or expressed sequence tags.
Alternative B: Search GenBank with a sample sequence using BLAST. If you have located a single sequence (nucleotide or protein) that is directly on target, you can perform a BLAST search of the GenBank database to identify similar sequences (even though the names attached to those sequences may be different from each other). To do a BLAST search, copy your reference sequence (highlight it and press ctrl-C). Now go to the BLAST section of GenBank (http://www.ncbi.nlm.nih.gov/blast) and select "blastp" for protein sequences or "blastx" for protein-coding nucleotide sequences. Uncheck the "filtered" box. Then paste (ctrl-V) the copied reference sequence into the text box and hit "search". Now wait for the answer. GenBank will check the entire database for sequences that may be similar to your reference sequence and will report back the "hits" in order of similarity.
Step 2: Selecting the "best" sequences
To support primer
design for the amplification of cDNA, choose the sequences identified in
GenBank that fit the following criteria:
a.
Complete cDNA sequences (do not use ESTs, partial cDNAs, exons or introns).
b. Select an
appropriate range of species. If you are going after a crab sequence, for
example, don't be satisfied with just mammalian sequences for comparison.
c.
Select an appropriate range of tissues or cell types.
To support primer design for amplifying genomic DNA, the selected sequences should fit criterion b above. Exons or introns or complete genomes should be targeted.
Step 3. Assembling the selected sequences into one file
One of your selected sequences should be on screen as a "GenBank report". Click here for an example. Scroll down until you find the amino acid sequence, highlight it, and copy it. Open a new word processor document. Paste the copied sequence into the document. Return to the GenBank report and copy the Accession Number and place it with your first sequence along with an appropriate name, using the following format, where AF167313 is the Accession Number for later retrieval:
>CrabAK AF167313
MADAATITKLEEGFKKLEAATDCKSLLKKYLTKSVFDQLKAKKT
SLGATLLDVIQSGVENLDSGVGVYAPDAEAYTLFSPLFDPIIEDYHKGFKQTDKHPNK
DFGDVNQFVNVDPDGKFVISTRVRCGRSMEGYPFNPCLTEAQYKEMESKVSSTLSNLE
GELKGTYHALTGMTKDVQQKLIDDHFLFKEGDRFLQAANACRYWPTGRGIYHNDNKTF
LVWCNEEDHLRIISMQMGGDLGQVYRRLVTAVNDIEKRVPFSHHDRLGFLTFCPTNLG
TTVRASVHIKLPKLAANRDKLEEVAGKYSLQVRGTRGEHTEAEGGVYDISNKRRMGLT
EFQAVKEMQDGILELIKIEKEMQ
>LimulusAK U09809
MVDQATLDKLEAGFKKLQEASDCKSLLKKHLTKDVFDSIKNKKT
GMGATLLDVIQSGVENLDSGVGIYAPDAESYRTFGPLFDPIIDDYHGGFKLTDKHPPK
EWGDINTLVDLDPGGQFIISTRVRCGRSLQGYPFNPCLTAEQYKEMEEKVSSTLSSME
DELKGTYYPLTGMSKATQQQLIDDHFLFKEGDRFLQTANACRYWPTGRGIFHNDAKTF
LVWVNEEDHLRIISMQKGGDLKTVYKRLVTAVDNIESKLPFSHDDRFGFLTFCPTNLG
TTMRASVHIQLPKLAKDRKVLEDIASKFNLQVRGTRGEHTESEGGVYDISNKRRLGLT
EYQAVREMQDGILEMIKMEKAAA
Now find a second sequence and cut and paste starting on a new line immediately following the first sequence, in the same document. Be sure to record the Accession Number so that you can give appropriate credit to the sources of your reference sequences at a later date. Continue copying and pasting until you have a sufficient number of reference sequences (up to six or so). The example here has two sequences. Save your document before proceeding! Then highlight and copy (Control-C) the entire set of sequences in preparation for the next step.
Step 4. Aligning the selected sequences using MultAlin.
Connect
to the MultAlin server by clicking on http://www.toulouse.inra.fr/multalin.html. Paste (Control-V) your set of sequences into
the query box provided and click on "Start MultAlin!". Wait for the
reply. The result page will contain a
gif file of the alignment. You may
change the parameters of the display and request a
realignment by clicking on "Start MultAlin!"
again. For example, you may wish to set
the high consensus value at 100% so that you will be able to visualize the
exact matches more easily.
Below
the alignment, you will see a list of available files. Click on "Results as text page (msf)" and save the file to your floppy disk, keeping
the suffix as ".msf". This file will be used for the next step:
GeneDoc.
Step 4b. Aligning protein
sequences using MegAlign (an alternative to MultAlin).
Part of the
Lasergene 6 package is MegAlign, a program that uses ClustalW and other algorithms to produce a multiple
alignment of selected protein (or nucleotide) sequences. You may specify the Accession Numbers of the
desired targets and MegAlign will automatically find
these sequences online. The resulting
alignment can be converted to a phylogenetic tree
within the program or saved as an msf file for
further processing in GeneDoc.
Step 5. Saving, modifying, and printing your alignment using GeneDoc.
Open the GeneDoc program (available for free download at www.psc.edu/biomed/genedoc). Start a new file and import the *.msf file that you saved from the MultAlin multiple alignment step.
You should now
see the alignment in the GeneDoc window, where you can alter colors, format,
width, and many other parameters, including sequence names. When you are
happy with what you see, you can simply print the whole thing.
Alternatively, if you want to save the alignment as a graphic, click on Copy and Select blocks. Proceed to highlight the entire alignment, then click on Copy again and then Copy selection as bitmap. You may now paste the alignment into a word processing or web document.
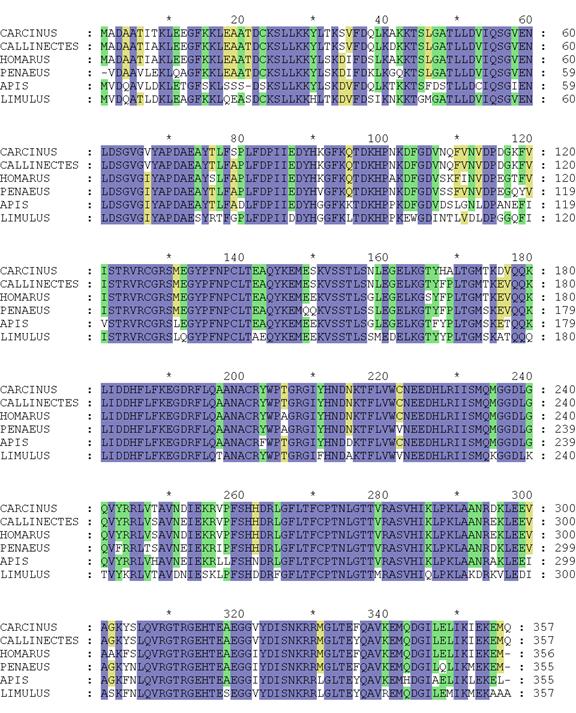
Here is an alignment from the two arginine kinase sequences listed above plus four others:
Step 6. You are now ready to proceed to primer design!
The key to primer
design based on an alignment of amino acid sequences is focusing on the
relationship between the amino acid sequence and the nucleotide sequence(s)
that may code for it. This step in
molecular cloning by PCR is the place where creativity and artfulness are
especially important. Nearly every other
step requires adherence to a strict protocol, but there’s some luck
associated with degenerate primer design.
A "good" primer pair has the following characteristics:
- Minimal degeneracy to insure the maximum likelihood of a sufficient concentration of the correct primer.
- Maximum specificity at the 3' end to optimize binding of primer to template.
- Minimal hairpin formation within the primer, especially producing a 3' end annealed to a potential template.
- Minimal primer dimer formation with one primer itself or with the other member of the pair, especially leaving an extendable 3' end.
- Approximately equal melting temperatures to simplify establishing the PCR reaction conditions.
Minimal
degeneracy is assured by locating amino acid regions rich in M's and W's and
deficient in L's, R's, and S's. Only you can make these choices, based on
the number of codons for the amino acids in your
selected protein segments. Because we usually use primers of 20-23
nucleotides, amino acid stretches of
Maximal
specificity at the 3' end is achieved by selecting a sequence that will give
you at least five nucleotides with no degeneracy. This means using a
terminal amino acid sequence including one M or W plus an amino acid with no
degeneracy in the first two positions of the next codon.
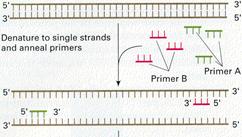
All DNA sequences (including primers) are written starting at the 5' end, with the 3' end to the right. For example: 5'-A T T C T g T C A C A g g g T A-3'. Defining the forward primer is straightforward, because it is identical to the stretch of codons that you have chosen, with provision made for codon degeneracy. The reverse primer, however, must be converted from the coding sequence to its complement (A->T, G->C, M->K, etc.) and then written in the reverse direction, nucleotide-by-nucleotide (not codon-by-codon).
To facilitate the
ordering of primers, give each a short name that includes your initials,
whether it’s a forward or reverse primer, and a specific numerical
designation (for example, DT-F1). Here
are the abbreviations used in indicating alternative nucleotide combinations
(lower case or script G
is used to
differentiate C and G easily):
|
A |
C |
G |
T |
A/C |
A/g |
A/T |
C/g |
C/T |
g/T |
A/C/g |
A/C/T |
A/g/T |
C/g/T |
A/C/g/T |
|
A |
C |
G |
T |
M |
R |
W |
S |
Y |
K |
V |
H |
D |
B |
N |
Hairpin and dimer formation as well as the melting temperature (Tm) can be calculated using
a Java applet called NetPrimer, available online at http://www.premierbiosoft.com/netprimer/netprlaunch/netprlaunch.html. Hairpins and primer dimers
should be avoided if at all possible, and melting temperatures for a forward
and reverse pair should be within 5oC of each other.
It is a good plan
to design two forward primers and two reverse primers for each sequence you
wish to amplify. At least one combination may work for you! It is
impossible to predict the success of any particular primer pair.
Following these suggestions should help you in you cloning efforts, but there
are no guarantees. Of course the very best primers are those that give
you one well-amplified product of the size and sequence of the thing
you’re after!
EXAMPLE OF
DEGENERATE PRIMER DESIGN BASED ON ALIGNED AMINO ACID SEQUENCES:
Using the
arginine kinase alignment, we see that there are many regions of conserved
sequence, candidates for design of forward and/or reverse primers. For the purposes of demonstrating design of a
forward primer, we will use the amino acid sequence TEAQYKEM starting at amino
acid 141 in the alignment. Assuming that
we are searching for a forward primer that will recognize the same sequence in
a crustacean (represented by the upper four sequences), we can ignore the
discrepancy with the Limulus sequence
since horseshoe crab is not a crustacean.
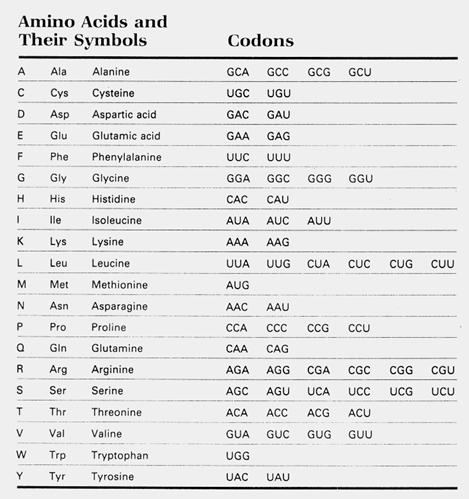
The first step would be to write down the possible codons
that could code for the selected sequence, using the codon
table above and substituting T for U since we are designing DNA primers:
|
Amino acids |
T |
E |
A |
Q |
Y |
K |
E |
M |
|
Codons |
ACA |
GAA |
GCA |
CAA |
TAC |
AAA |
GAA |
ATG |
|
|
ACC |
GAG |
GCC |
CAG |
TAT |
AAG |
GAG |
|
|
|
ACG |
|
GCG |
|
|
|
|
|
|
|
ACT |
|
GCT |
|
|
|
|
|
Note that the amino
acid sequence ends in M, thus providing a specific combination of nucleotides
at the 3’ end of the primer, important for maximum specificity at this
critical area. To calculate the degree
of degeneracy, multiply the number of different codons
at each position, in this case 4*2*4*2*2*2*2*1=512, representing the number of
different primer sequences that are possible that could encode the 8 amino acid
sequence that we selected. We have
managed to avoid any 6-codon amino acids in our choice of region but have
designed a highly degenerate primer nevertheless. The next operation is to convert the
multiplicity of sequences to a format that is recognized by the primer making
robot, using the single letter abbreviations noted above and lower case g to
differentiate between C and g. Thus the
forward primer that we have designed will be:
|
F Primer
5’ |
ACN |
gAR |
gCN |
CAR |
|
|
gAR |
ATg |
3’ |
Designing a
reverse primer is more complex. We start
with a candidate amino acid region, this time with as much specificity at the
left end as possible, since the reverse primer will be extended in that
direction during the polymerase chain reaction.
In our example, let’s look at the region beginning at amino acid
233: MQMGGDLG. This region is attractive
for several regions. First, it is
downstream from the forward primer, enabling binding of the reverse primer
downstream from the forward primer.
Second, it contains two Ms, meaning that six of the nucleotides in the
primer are completely specific. Third,
the segment contains only one 6-codon amino acid (L). And finally, it is far enough away from the
forward primer to produce an amplification product that will be detectable on
gel electrophoresis. Generally speaking,
a product greater than 200 nucleotides is preferable and this product is
predicted to be 300 nucleotides long, calculated from amino acid positions:
(233+7-140)*3. We start the same way we
did for forward primers:
|
Amino acids |
M |
Q |
M |
G |
G |
D |
L |
G |
|
Codons |
ATG |
CAA |
ATG |
GGA |
GGA |
GAC |
TTA |
GGA |
|
|
|
CAG |
|
GGC |
GGC |
GAT |
TTG |
GGC |
|
|
|
|
|
GGG |
GGG |
|
CTA |
GGG |
|
|
|
|
|
GGT |
GGT |
|
CTC |
GGT |
|
|
|
|
|
|
|
|
CTG |
|
|
|
|
|
|
|
|
|
CTT |
|
Then we enter the
single letter abbreviations as in the forward primer design:
|
“F”
Primer 5’ |
ATg |
CAR |
ATg |
ggN |
ggN |
gAY |
YTN |
ggN |
3’ |
To create a reverse
primer, there are two steps beyond this one: Writing the complementary sequence
to the “F” Primer we have just made, resulting in a
3’-to-5’ complementary sequence:
|
Complementary
3’ |
TAC |
gTY |
TAC |
CCN |
CCN |
CTR |
RAN |
CCN |
5’ |
Then we must
write that sequence in reverse to make the primer synthesizer happy, and to fit
the convention that all nucleotide sequences are written 5’-to-3’,
omitting the N at the 5’ end because it offers no increased specificity:
|
R Primer 5’ |
CC |
NAR |
RTC |
NCC |
NCC |
CAT |
YTg |
CAT |
3’ |
The primers boxed
in red are the ones we would order for synthesis, using the template available
at http://www.mdibl.org/orders/oligo.html.
You are on your
way to a successful PCR amplification!
(We hope!)
Designing
Non-Degenerate Primers Online
If
you are working with known species-specific sequences (for example from an EST
database), you can take advantage of several online primer design services. One, Primer Quest, is provided by Integrated
DNA Technologies, the source that we typically use for primer synthesis:
http://scitools.idtdna.com/Primerquest/
The second,
Primer 3, is provided by the Whitehead Institute at MIT and is used by a large
number of investigators:
http://frodo.wi.mit.edu/cgi-bin/primer3/primer3_www.cgi
A third choice is
Primer Premier, a superb commercially developed program that is used routinely
and quite successfully in our laboratory, available (for a price) at:
http://www.premierbiosoft.com/